

Learn how to pack travel gear for a 2 week trip with carry-on strategies, packing cubes, TSA liquid rules, and a minimalist packing list. Start packing.
As an Amazon Associate, Plan0gram earns from qualifying purchases made through links on this page.
Last Updated: September 25, 2026
Start With the Right Carry-On: Best Carry On Luggage 2026
Ask any frequent flyer what makes or breaks a two-week trip, and they’ll tell you it’s the bag. Not the destination. Not the seat. The bag. This guide from Plan0gram draws on 34 years of flying experience to show you exactly how to pack travel gear for a 2 week trip without checking a bag, without paying overweight fees, and without spending your first day at the destination doing laundry.
When I first started traveling, I made a costly error. My wife convinced me one giant hardcase would be simpler than two smaller bags. It was a nightmare. Heavy, didn’t fit in some cabs, wouldn’t fit in a tuk-tuk at all, and then an Airbnb with no elevator forced me to stop mid-trip and buy two smaller bags just to keep moving. “Costly” is an understatement, since we’d already paid for the giant one.
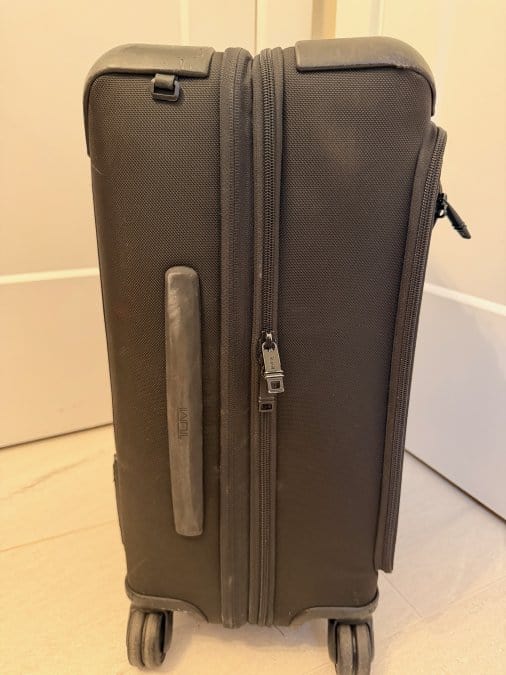
Tumi expandable rolling carry-on.
The bag that’s been with me for years – carry-on sized when compressed, expandable when the trip demands more.
This works easily as a straight carry-on. But if you’re headed somewhere that calls for formal wear, multiple pairs of shoes, or just more than a 40L bag can hold, an expandable bag like this one earns its keep. We recently flew to Italy with this exact bag compressed down, with plenty of room to spare. On the flight home, we had to check it, and it expanded further than I thought it could, still coming in under the weight limit even fully loaded.
- Check price on Amazon — the expandable style, for trips that need the extra capacity
What Size Carry-On Actually Works for 14 Days
A 40-liter carry-on is the sweet spot for most two-week trips. It fits standard overhead bins on mainline aircraft and forces the discipline that makes minimalist packing work. Anything larger invites overpacking and gate-check anxiety.
What I’d actually buy: a soft-sided 40L travel backpack for flexibility in tight overhead bins, or a hard-shell spinner if you’d rather not carry it on your back through a terminal.
- Check price on Amazon — soft-sided, compresses to fit
- Check price on Amazon — hard-shell, rolls instead of carries
As our two oldest kids graduated college, we gave each of them their first hard-side Tumi. The bags expand, yet still fit in any overhead bin. They can’t overpack, since the size simply won’t allow it. They’re lightweight, so you’re almost always under the weight limit even full. And if a zipper pull or handle ever comes off, there’s a Tumi store in most major airports that will fix it on the spot.
Weight Distribution and Ergonomics: The Factor Most Travelers Ignore
Here’s the part most guides skip: how your bag carries matters as much as what’s in it. Pack heavy items closest to your spine and centered over your hips. A bag that’s front-heavy pulls on your shoulders after 20 minutes of walking through ATL or ORD.
- Heaviest items (laptop, shoes, toiletries) go in the center, near the back panel
- Lighter items (clothing, layers) go toward the front and top
- Use the compression straps inside your bag to lock everything in place
Your Minimalist Packing List for 2 Weeks
The minimalist packing list for 2 weeks fits in one carry-on if you build it around versatility, not quantity. The math is simple: 14 days, roughly 7 outfits, one laundry cycle per week.
Your core list:
- 5-6 tops (mix of short and long sleeve)
- 3 bottoms (two pants, one shorts or skirt)
- 1 light jacket or mid-layer
- 7-8 pairs of underwear and socks
- 1 pair of walking shoes, 1 pair of sandals or dress shoes
- Toiletry kit, electronics, travel documents
That’s it. Everything else is optional.
Build a Capsule Wardrobe Around Quick-Drying Fabric
A capsule wardrobe works because every piece matches every other piece. Stick to two or three colors. Choose quick-drying fabric for anything you’ll wash in a sink, and odour-resistant merino or synthetic blends for items you’ll wear multiple times between washes.
Check price on Amazon — odor-resistant travel tops that hold up between washes
Digital Nomad and Remote Work Gear
If you’re working remotely during your trip, your gear list changes. Add a laptop, charger, compact mouse, and a universal adapter. Skip the external monitor unless your work absolutely requires it.
Check price on Amazon — one adapter for the whole trip, not one per country
:::tip Roll your charging cables and secure them with a hair tie or velcro strap. A flat-packed cable pouch takes up less space than a bundled one and lets you see everything at a glance. :::
How to Use Packing Cubes Effectively
Packing cubes are the single biggest space-saver for a two-week trip, but most people use them wrong. They stuff them full and create rigid bricks that waste the gaps between them.
Compression Bags vs. Packing Cubes: When to Use Each
Compression bags and packing cubes solve different problems. Use compression bags for bulky items like jackets or sweaters that you won’t need until later in the trip. Use packing cubes for daily-use clothing you’ll access repeatedly.
Tool | Best For | Downside | Buy |
|---|---|---|---|
Packing cubes | Daily clothing, organization | Add slight bulk | |
Compression bags | Bulky layers, cold-weather gear | Wrinkles clothing | |
Stuff sack | Dirty laundry, shoes | No structure |
TSA Liquid Rules for Carry-On: What You Can Actually Bring
TSA liquid rules for carry-on allow containers of 3.4 ounces or less, all fitting inside one quart-sized clear bag. That’s per person, and it’s enforced at security, not at the gate.
Skip the liquid limit entirely where you can:
- Check price on Amazon — solid shampoo bar, no bottle needed
- Check price on Amazon — toothpaste tablets, TSA-exempt
- Check price on Amazon — for the liquids you can’t replace
:::warning Don’t assume a “travel-size” label means TSA-compliant. Check the actual volume printed on the container. A 4-ounce bottle labeled “travel size” will get pulled at security and you’ll lose it. :::
How to Pack Travel Gear by Layer and Weight
Layering is how you pack travel gear efficiently. Think of your bag as a three-dimensional puzzle where weight and access frequency determine placement.
Step-by-Step: The 7-Layer Packing Method
- Layer 1: Base layer. Place shoes at the bottom, soles facing the back panel. Fill the hollow spaces inside shoes with socks or small items.
- Layer 2: Heavy core. Stack jeans, pants, and bulky items flat against the back panel.
- Layer 3: Packing cubes. Arrange filled cubes to fill the main compartment. Pack them snug but not rigid.
- Layer 4: Gap fillers. Tuck socks, belts, and small accessories into the spaces between cubes.
- Layer 5: Toiletry kit. Place your quart bag and toiletry kit in a top or side pocket for easy access at security.
- Layer 6: Electronics. Laptop and chargers go in a padded sleeve against your back or in a dedicated compartment.
- Layer 7: Personal item. Keep travel documents, medications, and one change of clothes in your personal item in case your carry-on gets gate-checked.
Expected result: A fully packed carry-on that passes the sizer, carries comfortably, and gives you access to everything you need without unpacking the whole bag.
How to Pack Travel Gear for Multi-Climate and Long-Haul Trips
Multi-climate packing comes down to layering, not bringing more clothes. A base layer, a mid-layer, and a shell cover everything from a chilly cabin to a warm arrival.
Sustainable Packing Choices That Also Save Space
Sustainable packing and minimalist packing overlap more than you’d expect. Reusable water bottles, solid toiletries, and a single versatile jacket replace dozens of disposable items. Fewer items means less space and less waste.
- Bring a collapsible water bottle instead of buying plastic at the airport — Check price on Amazon
- Switch to solid shampoo and conditioner bars to skip the liquid limit entirely
- Pack a lightweight reusable tote for groceries, laundry, or overflow
:::takeaway The most sustainable packing choice is bringing less. Every item you leave at home is one less thing to carry, wash, and lose. :::
Common Packing Mistakes and Post-Trip Gear Maintenance
The biggest packing mistake is packing for the trip you imagine instead of the trip you booked. Check the weather forecast for your actual destinations and pack for that, not for every possibility. But even seasoned travelers make subtle errors that cost time, money, or comfort. Here are the ones that show up again and again, plus a post-trip routine that will double the life of your gear.
Mistakes That Cost You at the Airport
- Overpacking “just in case” items. If you haven’t used it in the last year, leave it. A good rule: lay out everything you think you need, then remove 20%.
- Forgetting to weigh your bag before leaving for the airport. A luggage scale is cheap; overweight fees are not. Weigh your packed bag at home and again before your return flight, souvenirs add up. Check price on Amazon
- Packing valuables in a carry-on that might get gate-checked. If you’re on a regional jet like an E175 or CRJ, your rollaboard may not fit in the overhead. Keep medications, electronics, and documents in your personal item — and if a bag does end up gate-checked, a luggage tracker tells you exactly where it is instead of hoping the little tag holds.
- Skipping a packing checklist. Even frequent flyers forget chargers, adapters, or a toothbrush. A checklist on your phone eliminates the scramble.
- Not leaving room for souvenirs. A collapsible duffel or tote in your bag gives you overflow capacity for the return trip.
Post-Trip Gear Maintenance: The Step Most Guides Skip
After two weeks on the road, your gear has collected dirt, sweat, and maybe a little bit of that airport carpet grime. A few minutes of care before you store it will prevent odors, stuck zippers, and premature wear.
- Empty every pocket. Boarding passes, receipts, and loose change accumulate. Check the front pocket, the laptop sleeve, and the tiny pocket you forgot existed.
- Clean the interior. Wipe down the lining with a damp cloth and mild soap. For soft bags, turn them inside out and vacuum or brush out dust and crumbs.
- Clean the exterior. Hard-shell luggage: wipe with a damp cloth and mild detergent. Soft bags: spot-clean with a soft brush and let air dry completely before storing.
- Check zippers and wheels. Run a zipper lubricant (or a graphite pencil) along the teeth. Remove hair and debris from wheel housings, a common cause of stuck wheels.
- Air out your bag. Leave it open in a dry, ventilated area for 24 hours before storing. Never store a damp bag; that’s how mildew starts.
- Store smart. Stuff your bag with crumpled newspaper or a clean pillowcase to hold its shape, then place it in a dust bag or pillowcase. Avoid stacking heavy items on top.
:::takeaway A well-maintained bag can last a decade or more. Treat it like the tool it is, and it will be ready for your next two-week adventure without a trip to the repair shop. :::